

Using The Print Screen Key
Understanding The Basic Method
Taking a screenshot on your Windows computer is a useful skill to have, whether you want to capture an important document, save an image, or share information with others. One of the simplest methods to take a screenshot is by using the print screen key on your keyboard.
Step-By-Step Guide To Using The Print Screen Key
To take a screenshot with the print screen key, follow these simple steps:
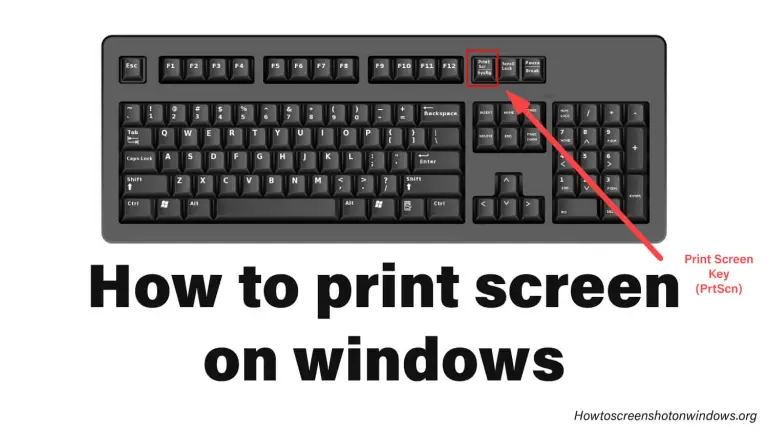
Find the print screen key on your keyboard. It is usually labeled as “Print Screen” or something similar. On most keyboards, you’ll find it in the upper right corner.
- Identify the content you want to capture on your screen. It could be an entire webpage, a specific window, or an image.
- Press the print screen key. This will capture the entire screen and store the screenshot in your computer’s clipboard.
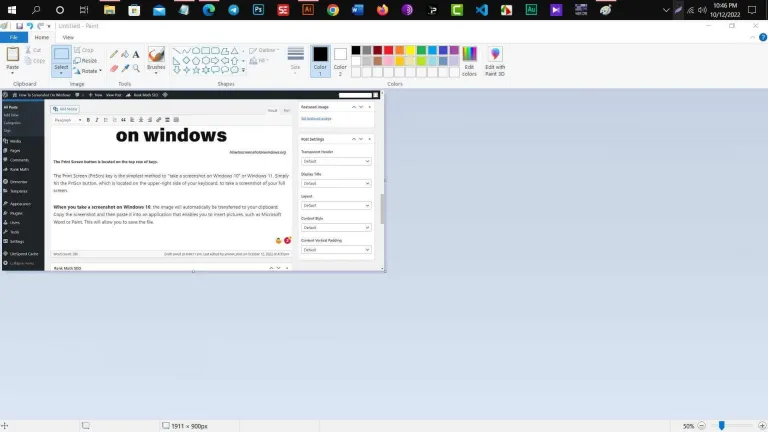
- Open an image editing software or a word processor like Microsoft Word.
- Paste the screenshot into the image editing software or word processor by pressing “ctrl + v” or right-clicking and selecting “paste.” The screenshot you captured will now appear.
- Save the screenshot to a location of your choice. Go to the file menu, select “save as,” and choose a suitable file format (such as jpeg or png). Give the screenshot a descriptive name and save it to a location where you can easily find it later.
- Optionally, you can edit the screenshot if needed. Use the editing tools in the image editing software to crop, resize, annotate, or add text to the screenshot before saving it.
- Congratulations! You have successfully taken a screenshot using the print screen key and saved it for future use.
Remember, the print screen key captures the entire screen. If you only need to capture a specific window, use the alt + print screen key combination instead. This will capture the active window rather than the entire screen.
Using the print screen key is a quick and efficient method to take screenshots on Windows. With just a few simple steps, you can capture and save important information or share it with others easily.
Арчер (2009) (Archer)
tagHD 1080, tagHD 720, tagto be continued…, tagПро шпионов
Боевик, Для взрослых, Зарубежные мультфильмы, Комедия, Мультсериалы
Режиссеры: Адам Рид, Брайан Фордни, Мак Уильямс
В ролях: Х. Джон Бенжамин, Джуди Грир, Эмбер Нэш
В международном шпионском агенстве ISIS любой мировой кризис — лишь предлог для высококлассных секретных агентов посоревноваться между собой в обмане и предательстве. Главным героем мультсериала является спецагент Стерлинг Арчер, известный также под кодовым именем «Герцогиня». На службе Арчеру приходится мириться со своей эксцентричной мамашей/начальницей — Мэлори, бывшей подружкой Ланой, озабоченной секретаршей Шерил и другими «интересными личностями».
Conclusion
Capturing screenshots on Windows has become an essential skill in the digital age. With the various methods outlined above, you can easily capture the content on your screen to share or save for future reference. The print screen key, snipping tool, and the Windows + shift + s shortcut offer versatility and convenience for capturing precisely what you need.
Additionally, using the built-in screenshot functionalities in specific software, such as games and web browsers, can make capturing screenshots even more efficient. Remember to utilize the editing and annotation tools available to further enhance your screenshots. Practice these techniques, and in no time, you’ll be a pro at taking screenshots on your Windows device.
So, whether you want to save important information, troubleshoot issues, or create informative tutorials, these methods will help you accomplish your goals with ease. Happy screenshotting!
Error Code 80090016
Snipping Tool: A Versatile Tool For Screenshots
Are you constantly searching for a quick and efficient way to capture screenshots on your Windows computer? Look no further than the snipping tool! This versatile tool offers a range of snipping modes and allows you to easily save and share your snips.
In this section, we will explore the ins and outs of the snipping tool, from accessing and opening it to utilizing its various features.
Introduction To The Snipping Tool
The snipping tool is a built-in screenshot utility that comes pre-installed with most Windows operating systems. It provides a user-friendly interface, making it accessible even to those with limited technical knowledge. With the snipping tool, you can capture screenshots of anything displayed on your screen, whether it’s a specific window, the entire screen, or a customized area.


How To Access And Open The Snipping Tool
Accessing and opening the snipping tool is a breeze. Follow these simple steps:
- Click on the “Start” menu located at the bottom left corner of your screen.
- Type “snipping tool” in the search bar.
- Select the snipping tool from the search results.
Once you’ve opened the snipping tool, you’re ready to start capturing screenshots!
Exploring Different Snipping Modes And Their Uses
The snipping tool offers several snipping modes, each tailored to different screenshot needs. Let’s take a closer look at these modes and their uses:
- Rectangular snip: This mode allows you to capture a rectangular area of your screen by simply dragging the cursor across the desired portion. Ideal for capturing specific content within a window or program.
- Free-form snip: With this mode, you can freely draw a shape around the area you wish to capture. It provides flexibility when dealing with irregular shapes or capturing content from non-standard Windows.
- Window snip: If you want to capture the entire content of a specific window, this mode is the way to go. Simply click on the window you want to capture, and the snipping tool will automatically take a screenshot of the entire window.
- Full-screen snip: As the name suggests, this mode captures the entire screen, including all open Windows and taskbars. It’s perfect for capturing the bigger picture or when you need to document the entire screen contents.
Saving And Sharing Your Snips
Once you’ve captured your desired snip, the snipping tool offers convenient options to save and share your screenshots. Here’s what you can do:
Save: Click on the floppy disk icon in the snipping tool interface to save your snip. Choose a location on your computer and provide a name for the file.
With the snipping tool’s intuitive features, you can effortlessly save and share your snips without any hassle.
So, whether you need to capture a specific window, highlight important information within a program, or simply want to share something interesting with others, the snipping tool has got you covered. Take advantage of its versatility and make the most out of this invaluable screenshot utility available right at your fingertips.
Start capturing those important moments on your Windows computer today!
How To Take a Screenshot On Windows
Сообщество (2009) (Community)
Зарубежный сериал, Комедия
tagHD 1080, tagHD 720, tagЗавершён, tagСитком
Режиссеры:Энтони Руссо, Тристрам Шапиро, Джо Руссо
В ролях:Джоэль МакХэйл, Гиллиан Джейкобс, Элисон Бри
Студенческое сообщество “Greendale Community College” эта компания, котороя состоит из школьных лузеров, недавно разведенных домохозяек и пожилых людей,которые стараются сохранить трезвый ум. “Community” повествует о компании изгоев, в центре внимания которой говорливый адвокат с аннулированной ученой степенью. Попадая в одну семинарскую группу они и в конечном итоге узнают о себе гораздо больше, нежели о предмете.
Гримм (2011) (Grimm)
Детектив, Драма, Зарубежный сериал, Ужасы, Фэнтези
tagHD 1080, tagHD 720, tagЗавершён
Экранизация по произведению:Томас Йен Гриффит, Джим Кауф, Дэвид Гринуолт
Режиссеры:Марк Баклэнд, Холли Дэйл, Омар Мадха
В ролях:Дэвид Джинтоли, Битси Таллок, Сайлас Уэйр Митчелл
Ник Бёркхардт, полицейский детектив убойного отдела из Портленда, случайно узнает, что он – потомок древнего рода Гриммов, обреченного сражаться с нечистью, живущей среди людей и принимающей их облик. Он — единственный человек, способный видеть ведьм, оборотней и троллей, и его судьба – защищать души людей от зловещих обитателей мира тьмы, проникающих в нашу реальность. Отныне детектив Ник начинает расследование иных преступлений, которые совершают кровавые злодеи, не принадлежащие к роду человеческому…
Third-Party Tools For Enhanced Screenshot Capabilities
Introduction To Third-Party Screenshot Tools
Capturing screenshots on Windows has become an essential skill in today’s digital age. While the built-in Windows snipping tool does a decent job, it often lacks some advanced features that can enhance your screenshot-taking experience. This is where third-party screenshot tools enter the scene.
These specialized software offer a range of benefits and extra capabilities that can make your screen-capturing endeavors even more efficient and effective. In this section, we will explore the various advantages of using these tools and provide recommendations for some popular options with advanced features.
Benefits Of Using Specialized Screenshot Software
Using specialized screenshot software brings several advantages that can greatly enhance your screenshot-taking experience. Let’s delve into some key benefits:
- Advanced editing: Third-party tools often provide a wide range of editing options, allowing you to annotate, highlight, crop, or blur specific areas of your screenshots. This helps in conveying your message concisely and effectively.
- Capture scrolling screens: Many third-party tools enable the capturing of scrolling screens, making them ideal for taking full-page website screenshots or lengthy documents that require multiple screenshots.
- Flexible output options: Specialized software allows you to save your screenshots in various formats, such as png, jpeg, gif, or even pdf. This flexibility ensures compatibility with different platforms and uses cases.
- Easy sharing and cloud integration: With third-party tools, sharing your screenshots becomes seamless. You can directly upload them to cloud storage services like google drive or Dropbox, or easily share them via email, social media, or instant messaging apps.
Recommendations For Popular Tools With Advanced Features
When it comes to choosing the right third-party screenshot tool, there are numerous options available in the market. Here are some popular recommendations that offer advanced features to enhance your screenshot capabilities:
- Snagit: Snagit is a powerful screenshot tool with an intuitive interface and a wide range of editing options. It enables you to capture scrolling screens, record videos, and even create gifs. With its advanced features like step-by-step guides and templates, Snagit is a favorite among professionals.
- Sharex: Sharex is an open-source and feature-rich screenshot tool with a customizable interface. It supports various capture modes, including scrolling captures, and offers a plethora of annotation and editing options. Additionally, shares integrate seamlessly with cloud services and boast an active user community for support and updates.
- Greenshot: Greenshot is a lightweight yet versatile screenshot tool that packs a punch. It provides an easy-to-use interface and offers customizable shortcuts. Greenshot allows you to capture full screens, specific Windows, or region-based screenshots. With its built-in editor, you can annotate, highlight, and add text to your screenshots effortlessly.
Utilizing these third-party screenshot tools will undoubtedly take your screen-capturing abilities to new heights. Take a moment to explore these options and find the one that best suits your needs and preferences. With their advanced editing capabilities, scrolling screen capture functionality, and seamless sharing options, you’ll be capturing and sharing screenshots like a pro in no time.


Mary McDonald-Lewis Wiki:
| Stage Name | Mary McDonald-Lewis |
| Real Name | Mary McDonald-Lewis |
| Profession(s) | Actress, Executive, |
| Birthday | September 24, |
| Zodiac Sign | Libra |
| Age | 69 years |
| Gender | Female |
| Birthplace | Stockton, United States |
| Hometown | Stockton, California, United States |
| Nationality | American |
| Parents | Father: N/A |
| Mother: N/A | |
| Sibling(s) | Brother(s): N/A |
| Sister(s): N/A | |
| School | N/A |
| College | N/A |
| Education | Not Available |
| YouTube | YouTube |
Family and Personal Life
Mary McDonald-Lewis‘ father’s name is N/A and Mary McDonald-Lewis‘ mother’s name is N/A.
Trivia
- Mary McDonald-Lewis was born in Stockton, United States.
- Mary McDonald-Lewis‘s birth sign is Libra.
- Mary McDonald-Lewis was born on September 24, 1953 in Stockton, California, USA. She is an actress and executive, known for G.I. Joe (1985), Twilight (2008) and Green Room (2015). (2015).
- Mary McDonald-Lewis was born on September 24, .
- As in 2023, Mary McDonald-Lewis’s age is 69 years.
- Mary McDonald-Lewis‘s birth sign is Libra.
- Mary McDonald-Lewis was born in Stockton, United States.
- As per the report, Mary McDonald-Lewis lives in Stockton, California, United States.
- Mary McDonald-Lewis‘s hobbies are Reading, photography, learning, traveling, internet surfing and to name a few.
- Mary McDonald-Lewis holds American nationality.
- Mary McDonald-Lewis‘s Instagram profile link read as .
- Most searched terms about Mary McDonald-Lewis on the Internet are Mary McDonald-Lewis age, Mary McDonald-Lewis wiki, Mary McDonald-Lewis photos, Mary McDonald-Lewis lover, Mary McDonald-Lewis instagram, Mary McDonald-Lewis facebook, Mary McDonald-Lewis family, Mary McDonald-Lewis salary, Mary McDonald-Lewis height, Mary McDonald-Lewis bio, Mary McDonald-Lewis income, Mary McDonald-Lewis house, Mary McDonald-Lewis latest news, Mary McDonald-Lewis tiktok, Mary McDonald-Lewis dating, Mary McDonald-Lewis musically.
FAQs
- Mary McDonald-Lewis was born on September 24, .
- As in 2023, Mary McDonald-Lewis’s age is 69 years.
- Mary McDonald-Lewis‘s birth sign is Libra.
- Mary McDonald-Lewis was born in Stockton, United States.
- As per the report, Mary McDonald-Lewis lives in Stockton, California, United States.
- Mary McDonald-Lewis‘s hobbies are Reading, photography, learning, traveling, internet surfing and to name a few.
- Mary McDonald-Lewis holds American nationality.
- Mary McDonald-Lewis‘s Instagram profile link read as .
- Most searched terms about Mary McDonald-Lewis on the Internet are Mary McDonald-Lewis age, Mary McDonald-Lewis wiki, Mary McDonald-Lewis photos, Mary McDonald-Lewis lover, Mary McDonald-Lewis instagram, Mary McDonald-Lewis facebook, Mary McDonald-Lewis family, Mary McDonald-Lewis salary, Mary McDonald-Lewis height, Mary McDonald-Lewis bio, Mary McDonald-Lewis income, Mary McDonald-Lewis house, Mary McDonald-Lewis latest news, Mary McDonald-Lewis tiktok, Mary McDonald-Lewis dating, Mary McDonald-Lewis musically.
Optimizing Screenshots: Tips And Tricks
Capturing screenshots is a handy feature that Windows offers, allowing you to capture a visual representation of what’s displayed on your computer screen. However, taking a screenshot is just the first step. To truly optimize your screenshots and make them more effective, here are some tips and tricks to keep in mind:
Tips For Capturing High-Quality Screenshots:
- Use the print screen key: Pressing the “print screen” button on your keyboard captures a screenshot of the entire screen. This is a quick and easy way to grab a snapshot of whatever you’re currently viewing.
- Snipping tool: Windows also provides a built-in snipping tool that allows you to select a specific portion of the screen to capture. This is useful when you only need a particular section of the screen and want to avoid unnecessary clutter.
- Experiment with different screenshot tools: There are numerous third-party screenshot tools available that offer additional features and functionalities. Consider exploring these tools to find the one that best suits your needs.
Optimizing Screenshots For Different Purposes:
- Choose the right file format: When saving your screenshots, it’s important to select the appropriate file format. For most scenarios, png or jpeg formats are commonly used. Png is ideal for images with transparent backgrounds, while jpeg is more suitable for vibrant images with lots of colors.
- Adjust image quality: Depending on the purpose of your screenshot, you may need to adjust the image quality. If you plan to share the screenshot online, it’s best to compress the image to reduce file size without compromising too much on quality. This ensures faster loading times and a better user experience.
- Consider annotations and captions: Sometimes, adding annotations or captions to your screenshots can provide further clarity for the viewer. This is particularly useful when creating tutorials or visual guides, allowing you to highlight specific areas or provide additional context.
Editing And Enhancing Your Screenshots:
- Crop and resize: To remove any unwanted elements or focus on a specific area, consider cropping your screenshots. Resizing can also be helpful to make the screenshot more visually appealing or fit within specific dimensions.
- Add emphasis with arrows or highlights: If you want to draw attention to a particular element within the screenshot, using arrows or highlights can be effective. This makes it easier for the viewer to understand the purpose or significance of the captured image.
- Enhance with filters or effects: For a more professional or polished look, you can apply filters or effects to your screenshots. Be cautious not to overdo it, as it may distract from the actual content.
By following these tips and tricks, you can optimize your screenshots to effectively communicate your message or provide visual support. Experiment with different techniques and tools to find the best approach for your specific needs. Capture, edit, and enhance your screenshots to create impactful visual content.
Frequently Asked Questions Of How To Take A Screenshot On Windows
How Do I Take A Screenshot On Windows?
To take a screenshot on Windows, press the print screen (Print Screen) button on your keyboard. Then, open an image editing program like paint, press ctrl + v to paste the screenshot, and save the file. You can also use the Windows snipping tool or snip & Sketch app for more advanced screenshot options.
How Do I Capture A Specific Window On Windows?
To capture a specific window on Windows, press alt + print screen (Print Screen) on your keyboard. This will capture only the active window and save it to your clipboard. You can then paste it into an image editing program or document.
How Do I Take A Screenshot Of A Specific Area On Windows?
To take a screenshot of a specific area on Windows, press the Windows key + shift + s. This will bring up the snip & Sketch app, allowing you to select the area you want to capture. Once selected, the screenshot will be saved to your clipboard for paste into an image editing program or document.
How Do I Take A Screenshot Of The Entire Screen In Windows 10?
To take a screenshot of the entire screen in Windows 10, press the Windows key + Print Screen on your keyboard. The screen will dim for a moment to indicate that a screenshot has been taken. The screenshot will be saved to your pictures folder in the screenshots subfolder.
How Do I Take A Screenshot On A Windows Tablet Or Mobile Device?
On a Windows tablet or mobile device, press the Windows logo button + volume down button at the same time to take a screenshot. The screenshot will be saved to your camera roll folder in the photos app.
Using Windows + Print Screen: Automatically Saving Screenshots
Understanding The Windows + Print Screen Shortcut
Are you tired of using third-party software or complex keyboard shortcuts to capture screenshots on your Windows computer? Well, you’re in luck! Windows offers a simple and convenient built-in shortcut that allows you to take screenshots with just a click of a button.
The Windows key combined with the Print Screen key is your secret weapon for capturing screenshots effortlessly. Let’s dive into how this powerful shortcut works.
Key points:
- The Windows + Print Screen shortcut captures the entire screen and saves it as an image file.
- Unlike other methods, this shortcut requires no additional software or setup.
- The captured screenshot is automatically saved to a designated folder on your computer.
How To Enable Automatic Screenshot Saving
Enabling automatic screenshot saving ensures that your captured images are not only conveniently saved but also readily accessible whenever you need them. To set up this feature on your Windows computer, follow these simple steps:
- Press the Windows key + r to open the run dialog box.
- Type “gpedit.msc” in the text field and hit enter. This opens the local group policy editor.
- In the left-hand pane, navigate to “computer configuration” > “administrative templates” > “Windows components” > “file explorer”.
- Locate the setting named “screen captures” and double-click on it.
- In the new window, select the “enabled” option.
- Under the “options” section, specify the folder where you want your screenshots to be saved.
- Once you’ve chosen the folder, click “apply” and then “ok” to save the changes.
Remember, this method is only applicable to Windows Pro, enterprise, and education editions. If you’re using a different version of Windows, don’t worry! You can still manually save your screenshots by pressing the Windows key + Print Screen and pasting the captured image into an image editing program.
Locating And Organizing Your Saved Screenshots
Now that you’ve successfully captured and saved your screenshots using the Windows + Print Screen shortcut, it’s essential to know where to find them and keep them organized. Follow these steps to locate your saved screenshots:
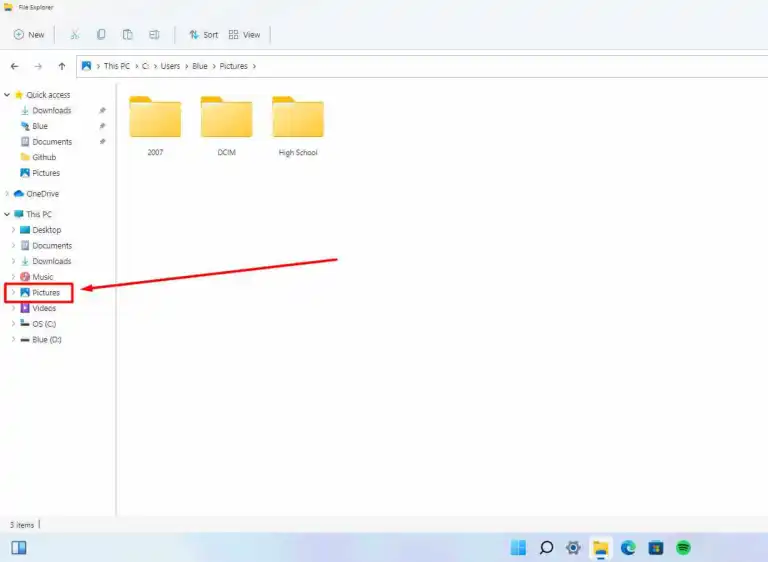
- Open the file explorer by pressing the Windows key + e.
- In the left-hand pane, click on “pictures” to navigate to your default pictures folder.
- Look for a subfolder named “screenshots” within the pictures folder. This is where your captured screenshots are automatically saved.
- Upon finding the screenshots folder, you can browse through your screenshots, open them, or copy them to any desired location.
To keep your screenshot collection organized, consider creating subfolders within the screenshots folder. This way, you can categorize your screenshots based on various projects, tasks, or any other system that suits your needs. Simply right-click within the screenshots folder, select “new,” and choose “folder” to create a new subfolder.


With the Windows + Print Screen shortcut and the ability to automatically save screenshots, capturing and locating your screen moments has never been easier. Start utilizing this incredible feature and unlock a more efficient way to work with screenshots on your Windows computer.
Бэтмен: мультсериал (1992) (Batman: The Animated Series)
tagHD 720, tagЗавершён, tagКомикс, tagСверхспособности
Боевик, Детектив, Драма, Зарубежные мультфильмы, Криминал, Мультсериалы, Семейный, Триллер, Фэнтези
Экранизация по произведению: Майкл Ривз, Брюс В. Тимм, Джерри Конуэй
Режиссеры: Джейн Алан, Лорен Лестер, Боб Хатингс
В ролях: Кевин Конрой, Ефрем Цимбалист мл., Боб Хатингс
Мультсериал больше ориентирован на взрослую публику, в отличии от предыдущих типичных мультфильмов про супергероев. Стремясь сделать его более «тёмным», создатели мультсериала превысили общепринятые границы мультфильмов в этом жанре: «Бэтмен: мультсериал» стал первым мультфильмом, в котором было изображено огнестрельное вместо лазерного оружия; Бэтмен на самом деле бил руками и ногами противников, также присутствовала кровь; в дополнение ко всему, многие фоны в мультсериале были нарисованы на чёрной бумаге (стиль ар-деко с очень тёмной гаммой цвета). По началу, создатели мультсериала Тимм и Радомски столкнулись с сопротивлением и недовольством со стороны руководства студии, но успех первого фильма Бёртона о Бэтмене оказал им хорошую поддержку, тогда была выпущена пилотная серия, которая, по словам Тимма «скинула много людей с наших спин».